
• Format: MPEG-4/H.264
• Resolution: 480 x 272 (iPhone & iPod compatible)
• Size: 10.4 MB
• Length: 2 minutes, 57 seconds
Show Notes
Apple's Remote app is free and works with any device running iOS 3.1.2 or later.
To subscribe to the Macworld Video stream via iTunes, click here.
You can also see a complete archive of all our videos on Macworld's YouTube channel. Subscribe to that channels and you will be notified whenever we post a new video.
Or just point your favorite podcast-savvy RSS reader to: http://feeds.macworld.com/macworld/video/
Show transcript
 This is Macworld senior associate editor Dan Moren and I'm here with our weekly video tip. Today, I'm going to show you how to set up iTunes Home Sharing.
Like Apple's $25-per-year iTunes Match service, iTunes Home Sharing lets you stream media from an iTunes library to your iOS device, Apple TV, or another computer. But there are two key differences: as the name suggests, Home Sharing only works over your local network, and, unlike iTunes Match, it's completely free.
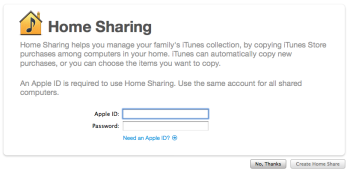
To set up iTunes Home Sharing, you'll first enable it in iTunes on your Mac. To do so, go to the Advanced menu and choose Turn on Home Sharing; you can also click on the Home Sharing icon under the Shared section of iTunes's sidebar. Either way, you'll be prompted to enter an Apple ID and password--it's important to note that all Home Sharing features are keyed off this Apple ID, so you must make sure to enter the same one on every device you want to use.
Once you've enabled the feature, your other computers with Home Sharing will appear under the Shared section. Clicking on a computer will reveal the iTunes Library of that machine, which you can search, browse, sort, and play just as you normally would in iTunes.
At the bottom of the screen, however, you'll find a few additional options. For example, you can filter the song listing to show only tracks that don't exist on this computer. And, if you select a track or multiple tracks, you can download them to the local computer by clicking the Import button. You can also use Home Sharing to automatically transfer new purchases from one of your other computers, so that every time you buy something from iTunes on one Mac, it appears on another.
Home Sharing can also be used on your iOS devices. First, go to Settings -> Music and enter your Apple ID and password. Then launch the Music app and tap the More button in the bottom toolbar. You'll see a new Shared entry; tap on that and you'll get the option to select from any computer on your network that has Home Sharing enabled. Once you've picked a computer, the Music app will load all the tracks from its iTunes library, and you'll again be able to use them just as you would the iOS device's local media.
 You can also use Home Sharing to stream video. After you've enabled the feature in Settings, open up the Videos app and you'll see a Shared option at the top, which will behave just like its counterpart in the Music app.
Home Sharing has one more handy trick up its sleeve. If you've got an Apple TV, not only can you stream media from your computers to your Apple TV, but you can also download Apple's free Remote app and use your iOS device to control the set-top box.
You'll have to enable Home Sharing on your Apple TV by going to the Computers menu and selecting Turn On Home Sharing. You'll need to enter your Apple ID and password using the Apple TV's remote, but once you've done that, you'll be able to select your Apple TV from the Remote app, and then control all of its functions from there. And it's certainly a lot easier to enter text from an iOS device's virtual keyboard than it is from a simple remote.
I'm Dan Moren. This has been Macworld's video tip. Thanks for watching.
For more Macintosh computing news, visit Macworld. Story copyright © 2011 Mac Publishing LLC. All rights reserved.
No comments:
Post a Comment